Yeast-Free Tacos
I often eat beans and tortillas, but this recipes makes it a meal. I love it!
Ingredients
1 can black beans
1/2 can diced tomatoes (italian flavor if possible)
1 cup shelled edemame
1 cup shredded veggies (I used brocoli slaw)
Salt and pepper
Season salt
1o corn tortillas (organic and yeast free)
4 T. coconut oil
Avocados
Instructions
Scoop the oil into a frying pan until it crackles. Place 3 small corn tortillas into the oil and hold them over in half. Cook for 2 to 5 minutes. Try not to burn. Place cooked taco shells to dry on a paper towel to drain extra oil.
While the tortillas are cooking, mix together the rest of the ingredients (except the avocados) and bring to a boil. Cook on medium heat for 5 minutes or until the shredded veggies are very soft. Drain some of the liquid. Cool to eating temperature. Fill the taco shells with about 2 tablespoons of mix. Top with chopped avocado and salt.
Saturday, June 26, 2010
Sunday, June 20, 2010
Equipment from the Test Kitchen
AMCO Houseworks Enameled Lemon Squeezer, model 06-0354 $11.99
Surprisingly easy to use—juice gushes out. Of the squeeze-style juice presses we tested, this was the most comfortable and effective, with curved handles and a well-shaped plunger. Squeezing the rounded handles didn’t hurt our hands like others of this style, and seeds were contained. It was also attractive, sporting a bright yellow finish, but hand-washing is best if you want to keep the paint from chipping. (We tested the paint and found it lead-free.)
Fantes Stainless Portion Scoop #16 $11.99
A perfect circle divided in half, this portion scoop doubles well as a scoop for softer ice cream, though the food “pusher” activated by the squeezable handle was an obstacle when pressing down to scoop hard-frozen ice cream.
iSi Basics Silicone Scraper Spatula $5.99
Perfectly contoured to fit the side of a bowl, this scraper had the most surface contact of all the scrapers. No dough or batter was left behind. It gained rigidity from a steel insert. Opposite the contoured side is a straight edge that doubles as a bench scraper or dough cutter, making this a multipurpose winner.
Victorinox (formerly Victorinox Forschner) 6-inch Straight Boning Knife: Flexible $19.95
The nonslip grip and narrow, straight blade let testers remove the smallest bones with precision and complete comfort. Perfectly balanced with enough flexibility to maneuver around tight joints. The low price was a bonus.
Williams-Sonoma Dial-A-Slice/Adjustable Apple Divider $19.95
Although it took some effort, this slicer plunged through the thick peel and firm flesh of a Granny Smith and made neat, uniform slices of softer Golden Delicious and McIntosh apples. Adjustable blades make eight or 16 slices. Its wider-than-usual, 1-inch, serrated corer gripped the apple and ensured the entire core was removed. We also liked the comfortable rubber handles and plastic cap that pushes the hard-to-reach bottom of the apple entirely through the blades. (Other models left slices attached, forcing us to push the apple back up, which meant we were handling the sharp blades.) A bonus: The cap fits onto the slicer for storage, providing protection from the blades.
All-Clad Stainless 12-Inch Fry Pan $135.00
Testers praised this pan for having “everything you need in a skillet and nothing you don’t,” with enough cooking surface for sautéing eight chicken pieces without crowding; steady, controlled heat for excellent browning; and a good shape with low sides. The weight balance was outstanding; it was easy to manipulate and lift. In the durability test, it sustained the least damage, with barely visible dents.
Sanyo Electric Rice Cooker & Steamer, Model ECJ-N55W, 5 1/2 cups $54.95
The Sanyo excelled with all three types of rice, especially the brown rice, and it was our second-lowest-priced model. Two minor complaints: After two hours in the keep-warm stage the rice became a bit dry, and the indicator lights were hard to read in a bright kitchen.
ThermoWorks Original Cooking Thermometer/Timer $19.00
This user-friendly model allows you to view both time and temperature simultaneously and is free of the annoying and unnecessary USDA-recommended presets for various types of meat that are all too common in other brands. The model lost points for having probes that are sometimes defective.
R.S.V.P. International Onion Goggles $19.00
While they certainly look a bit goofy, the goggles do help maintain focus on the onions—yellow, Vidalia, red, or otherwise—rather than the tissue box. We found that they block irritating fumes better than sunglasses, and the foam padding around the antifog lenses is a more comfortable alternative to swim goggles. Available in white or black with lime green trim.
Kyocera Adjustable Ceramic Mandoline Slicer $26.96
"It looks like a toy, but it works like crazy!" exclaimed one tester, who pledged to go out immediately and buy one. No julienne or waffle blades, but this slicer is razor-sharp, adjusts easily, and fits in a drawer. Plus the price is right.
Tovolo Silicone Spatula $8.99
This sleek spatula has curves in all the right places. It may look like it’s just going to be decorative—until you use it. Then it passes every performance test, scraping, stirring, folding, and sautéing like a champ. It also withstood our attempts to stain and melt it.
Skillet Roasted Chicken
Serves 4 -- Video of this recipe at the America's Test Kitchen website
A whole 4-pound chicken, cut into 8 pieces, can be used instead of the chicken parts. Use a splatter screen when browning the chicken.
Ingredients
Chicken
- 3 1/2 pounds bone-in, skin-on chicken parts (breasts, thighs, and drumsticks, or a mix, with breasts cut in half), trimmed of excess fat (see note)
- 1 tablespoon vegetable oil
- 1 - 1 1/4 cups low-sodium chicken broth
Lemon-Herb Sauce
- 1 teaspoon vegetable oil
- 1 medium shallot , minced (about 3 tablespoons)
- 1 teaspoon unbleached all-purpose flour
- 1 tablespoon lemon juice
- 1 1/2 tablespoons minced fresh parsley leaves
- 1 1/2 tablespoons minced fresh chives
- 1 tablespoon cold unsalted butter
Instructions
- 1. FOR THE CHICKEN: Pat chicken dry and season with salt and pepper. Heat 2 teaspoons oil in 12-inch nonstick skillet over medium-high heat until shimmering. Add chicken pieces skin-side down and cook without moving until golden brown, 5 to 8 minutes.
- 2. Using tongs, flip chicken pieces skin-side up. Reduce heat to medium-low, add 3/4 cup broth to skillet, cover, and cook until instant-read thermometer inserted into thickest part of chicken registers 155 degrees for breasts and 170 degrees for legs and thighs, 10 to 16 minutes (smaller pieces may cook faster than larger pieces). Transfer chicken to plate, skin-side up.
- 3. Pour off liquid from skillet into 2-cup measuring cup and reserve. Using tongs, wipe skillet with paper towels. Add remaining teaspoon oil to skillet and heat over medium-high heat until oil is shimmering. Return chicken pieces skin-side down and cook undisturbed until skin is deep golden brown and crisp and it reaches 160 degrees for breasts and 175 degrees for legs and thighs, 4 to 7 minutes. Transfer to serving platter and tent loosely with foil. Using spoon, skim fat from reserved cooking liquid and add enough broth to measure 3/4 cup.
- 4. FOR THE SAUCE: Heat oil in now-empty skillet over low heat. Add shallot and cook, stirring frequently, until softened, about 1 minute. Add flour and cook, stirring constantly, 30 seconds. Increase heat to medium-high, add reserved cooking liquid, and bring to simmer, scraping skillet bottom with wooden spoon to loosen browned bits. Simmer rapidly until reduced to 1/2 cup, 2 to 3 minutes. Stir in any accumulated juices from resting chicken; return to simmer and cook 30 seconds. Off heat, whisk in lemon juice, parsley, chives, and butter; season with salt and pepper. Pour sauce around chicken and serve immediately.
Technique
-
Keys to Crisp Skin and Juicy Meat
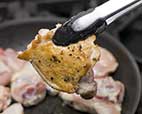
1. SEAR the raw chicken pieces to jump-start the cooking process and crisp the skin.
-
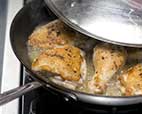
2. STEAM the chicken in broth to cook it quickly and evenly and to render fat from the skin.
-
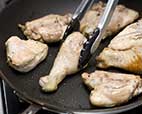
3. RE-CRISP the chicken pieces in the cleaned skillet to create super thin, ultracrisp skin.
Sunday, June 6, 2010
Hungarian Beef Stew
Hungarian Beef Stew
From the episode: Classic Beef Braises
Serves 6
Do not substitute hot, half-sharp, or smoked Spanish paprika for the sweet paprika in the stew (see our recommended brands at right), as they will compromise the flavor of the dish. Since paprika is vital to this recipe, it is best to use a fresh container. We prefer chuck-eye roast, but any boneless roast from the chuck will work. Cook the stew in a Dutch oven with a tight-fitting lid. (Alternatively, to ensure a tight seal, place a sheet of foil over the pot before adding the lid.) The stew can be cooled, covered tightly, and refrigerated for up to 2 days; wait to add the optional sour cream until after reheating. Before reheating, skim the hardened fat from the surface and add enough water to the stew to thin it slightly. Serve the stew over boiled potatoes or egg noodles.
INGREDIENTS
- 1 (3 1/2- to 4-pound) boneless beef chuck-eye roast , trimmed of excess fat and cut into 1 1/2-inch cubes (see note)
- Salt
- 1/3 cup sweet paprika (see note)
- 1 (12-ounce) jar roasted red peppers , drained and rinsed (about 1 cup)
- 2 tablespoons tomato paste
- 3 teaspoons white vinegar
- 2 tablespoons vegetable oil
- 4 large onions , diced small (about 6 cups)
- 4 large carrots , peeled and cut into 1-inch-thick rounds (about 2 cups)
- 1 bay leaf
- 1 cup beef broth , warmed
- 1/4 cup sour cream (optional; see note)
- Ground black pepper
INSTRUCTIONS
- 1. Adjust oven rack to lower-middle position and heat oven to 325 degrees. Sprinkle meat evenly with 1 teaspoon salt and let stand 15 minutes. Process paprika, roasted peppers, tomato paste, and 2 teaspoons vinegar in food processor until smooth, 1 to 2 minutes, scraping down sides as needed.
- 2. Combine oil, onions, and 1 teaspoon salt in large Dutch oven; cover and set over medium heat. Cook, stirring occasionally, until onions soften but have not yet begun to brown, 8 to 10 minutes. (If onions begin to brown, reduce heat to medium-low and stir in 1 tablespoon water.)
- 3. Stir in paprika mixture; cook, stirring occasionally, until onions stick to bottom of pan, about 2 minutes. Add beef, carrots, and bay leaf; stir until beef is well coated. Using rubber spatula, scrape down sides of pot. Cover pot and transfer to oven. Cook until meat is almost tender and surface of liquid is ½ inch below top of meat, 2 to 21/2 hours, stirring every 30 minutes. Remove pot from oven and add enough beef broth so that surface of liquid is ¼ inch from top of meat (beef should not be fully submerged). Return covered pot to oven and continue to cook until fork slips easily in and out of beef, about 30 minutes longer.
- 4. Skim fat off surface; stir in remaining teaspoon vinegar and sour cream, if using. Remove bay leaf, adjust seasonings with salt and pepper, and serve.
TECHNIQUE
SKIPPING THE SEAR, BUT NOT THE FLAVOR
Most stews begin by browning meat on the stovetop to boost flavor. They also call for lots of added liquid. Our recipe skips the sear and goes into a moderate 325-degree oven. Though this relatively low temperature can’t compare with the sizzling heat of a 500-degree skillet, over time, the dry top layer of meat will reach 300 degrees—the temperature at which the meat begins to brown, forming thousands of new flavor compounds. But only the top of the meat will brown; due to the surrounding liquid, the submerged part of the meat can’t rise above the boiling point of water, or 212 degrees Fahrenheit.
Chocolate Chip Cookies American Test Kitchen
Makes 16 cookies
Avoid using a nonstick skillet to brown the butter; the dark color of the nonstick coating makes it difficult to gauge when the butter is browned. Use fresh, moist brown sugar instead of hardened brown sugar, which will make the cookies dry. This recipe works with light brown sugar, but the cookies will be less full-flavored. For our winning brand of chocolate chips, see related tasting.
INGREDIENTS
- 1 3/4cups unbleached all-purpose flour (8 3/4 ounces)
- 1/2teaspoon baking soda
- 14tablespoons unsalted butter (1 3/4 sticks)
- 1/2cup granulated sugar (3 1/2 ounces)
- 3/4cups packed dark brown sugar (5 1/4 ounces) (see note)
- 1teaspoon table salt
- 2teaspoons vanilla extract
- 1large egg
- 1large egg yolk
- 1 1/4cups semisweet chocolate chips or chunks (see note)
- 3/4cup chopped pecans or walnuts, toasted (optional)
INSTRUCTIONS
- 1. Adjust oven rack to middle position and heat oven to 375 degrees. Line 2 large (18- by 12-inch) baking sheets with parchment paper. Whisk flour and baking soda together in medium bowl; set aside.
- 2. Heat 10 tablespoons butter in 10-inch skillet over medium-high heat until melted, about 2 minutes. Continue cooking, swirling pan constantly until butter is dark golden brown and has nutty aroma, 1 to 3 minutes. Remove skillet from heat and, using heatproof spatula, transfer browned butter to large heatproof bowl. Stir remaining 4 tablespoons butter into hot butter until completely melted.
- 3. Add both sugars, salt, and vanilla to bowl with butter and whisk until fully incorporated. Add egg and yolk and whisk until mixture is smooth with no sugar lumps remaining, about 30 seconds. Let mixture stand 3 minutes, then whisk for 30 seconds. Repeat process of resting and whisking 2 more times until mixture is thick, smooth, and shiny. Using rubber spatula or wooden spoon, stir in flour mixture until just combined, about 1 minute. Stir in chocolate chips and nuts (if using), giving dough final stir to ensure no flour pockets remain.
- 4. Divide dough into 16 portions, each about 3 tablespoons (or use #24 cookie scoop). Arrange 2 inches apart on prepared baking sheets, 8 dough balls per sheet. (Smaller baking sheets can be used, but will require 3 batches.)
- 5. Bake cookies 1 tray at a time until cookies are golden brown and still puffy, and edges have begun to set but centers are still soft, 10 to 14 minutes, rotating baking sheet halfway through baking. Transfer baking sheet to wire rack; cool cookies completely before serving.
Subscribe to:
Posts (Atom)